After loading an aircraft, open SimVimX Configurator from the X-Plane menu --> SimVimX.
1) If the loaded aircraft is already included in the list of assigned planes in SimVimX v.3, the main configuration window will open in the I/O Hardware mode.
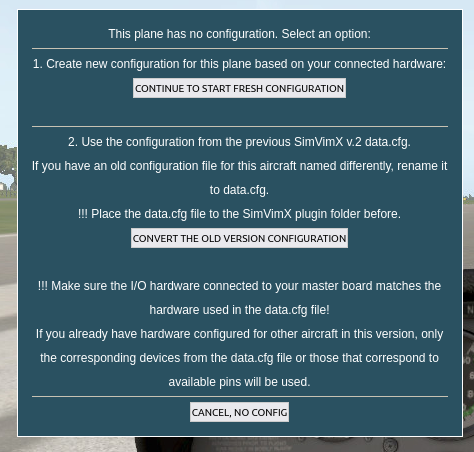
2) If SimVimX v.3 does not have a configuration for this aircraft, you will first need to choose one of two options: either continue setting up the I/O data from scratch for the connected hardware, or convert the configuration from an older data.cfg file (from SimVimX v.2.xx, if you used it previously) for this aircraft:
3) If you don't want the loaded aircraft model to be included in the SimVimX3 aircraft configuration list, don't do anything, just close the config window (you don't plan to use this aircraft or want to add it later).
When you select this option and this is the first aircraft for which you are going to create configuration in SimVimX v.3, you neew physically connect the required I/O devices to the master board and also "connect" all corresponding devices in the SimVimX configuration window (in I/O Hardware Mode). These connections can be made in any order (physically or in the interface), and you can gradually add or disconnect different devices as needed or for testing.
Every device can be then configured for the plane model using either predefined mappings or standard and custom datarefs and commands for this plane (in Data Entry Mode).
If you previously have configured I/O hardware for at least one aircraft in SimVimX v.3, the configuration window will opens with all I/O devices connected to the master board, but without data assigned to them, and you can start configuring that devices for this plane model.
Since the I/O device set is fixed for a single Mega2560 master board, you get the same I/O hardware configuration for any aircraft model you load.
However, the data configuration is specific to each aircraft you load, and you can create new configuration for each aircraft you launch for the first time based on the same hardware mapping.
The master board may have different equipment connected to it, with some of it used only by certain aircraft models. Only those I/O hardware devices will be working that are assigned for the currently loaded airсraft.
! Before selecting this option, make sure the plugin folder contains the old SimVimX v.2.2 configuration file (data.cfg) suitable for the selected aircraft, then click the button CONVERT FROM OLD DATA.CFG (it will do nothing if the data.cfg file is missing). The plugin will use the data from this file to create an aircraft configuration for the new version 3.**
**If you have an old file for this aircraft named differently (something like "Your Plane v1.cfg"), rename it to data.cfg and place into the SimVimX plugin folder.
A) For the first aircraft you are going to create a configuration for in SimVimX v.3, the entire configuration from the old data.cfg file will be converted and saved in the global configuration file, all I/O connections will be generated for display in the user interface, and all inputs/outputs for the aircraft itself will be assigned in the form of commands, datarefs, and all necessary parameters which you later can easily edit or change if necessary.
B) If the loaded aircraft is not the first one you have configured in SimVimX v.3 and uses a different ("dedicated") data.cfg file, then only those I/O devices from that data.cfg file that match previously assigned equipment or those that match available free pins will be configured for this aircraft.
The main configuration window consists of three areas: 1) I/O Hardware, 2) Devices/Data Entry, and 3) Lists of predefined, standard, or custom functions for assignment. Two buttons located at the top of the window are used to switch between hardware assignment and data entry mode:

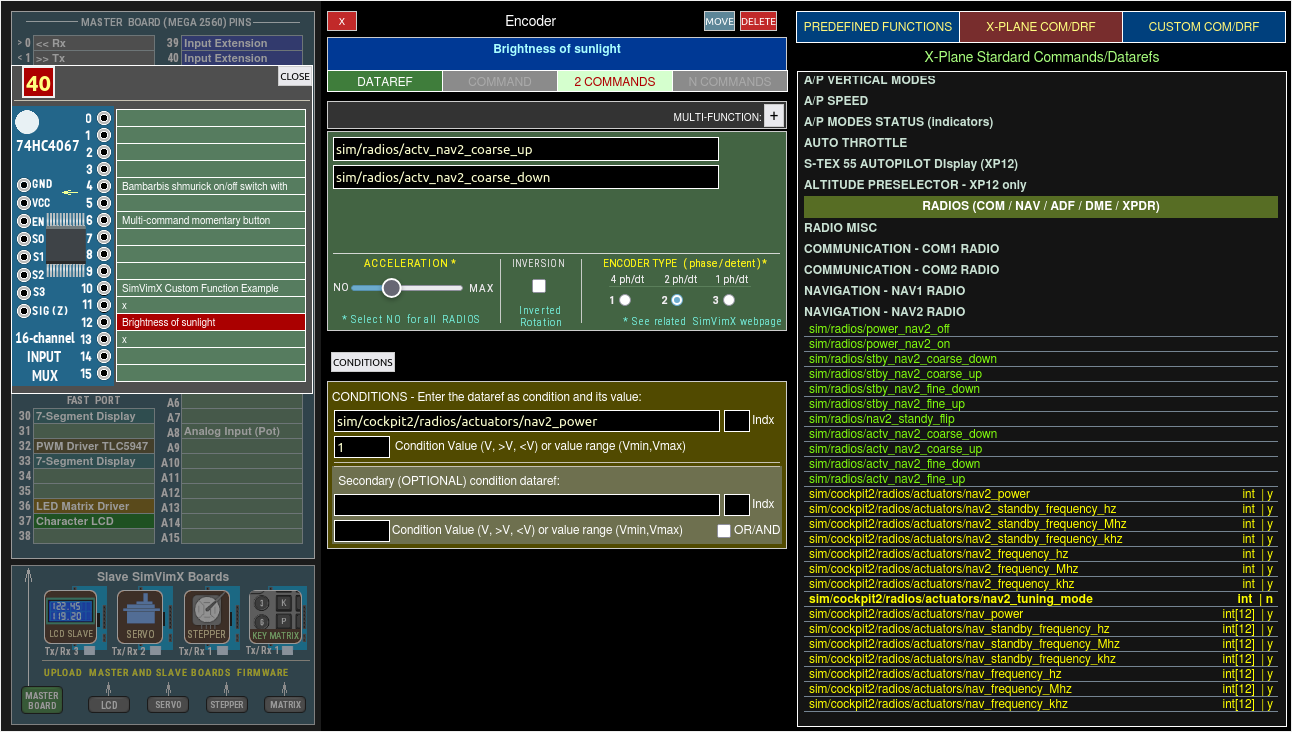
Left area always shows the master board with all I/O devices connected to it - input and output extensions, LED drivers, displays and slave boards
In the I/O HARDWARE MODE, all available devices are displayed in the central area. Simply select the desired device and click the pin (direct or extended I/O) available for that device on the master board, slave board or input (output) extension.
When you select any assigned device in DATA ENTRY MODE, this section displays the data entry fields and parameters available for that I/O device type.
1. The easiest way is to use the data from the section on the right, where you can select a variety of complex predefined functions and assign data to a device with a single click on the image maps. There are also maps with predefined functions for standard and some popular aircraft (e.g., B738Zibo, A321 Tollis, B757 FF, and others).
2. You can also fill the command/dataref fields selecting standard or custom datarefs/commands from the tables in the right section, and manually add required values, conditions.
3. Finally, you can completely populate the data fields manually using any datarefs/commands with options.
The third area has three data selection section:
1) The PREDEFINED FUNCTIONS section contains the predefined standard or custom functions displayed in form of image maps, the same way as in the web-based interface for the previous SimVimX v2.
All you need to do to configure any acceptable input or output is to select the assigned hardware at the left side of the user interface in Data Entry mode (or connect a new device first) and then find and click the function you want to configure in the chosen image map window.
2) The X-PLANE COM/DRF section contains the list of all X-Plane's standard commands and datarefs usable for the cockpit hardware assignment grouped by categories. You can select one of the "connected" hardware items on the left side, select the dataref or command field you want to fill and then find and assign the relevant dataref of command(s) to it.
3) The CUSTOM COM/DRF section contains the list of custom commands and datarefs detected by the plugin for the selected aircraft model.