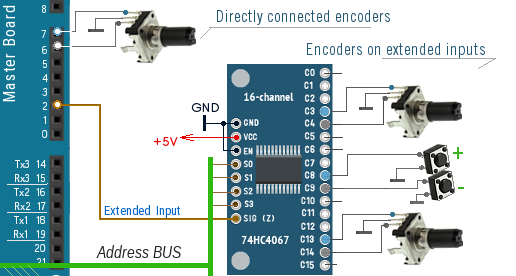
To work with SimVimX all encoders should be connected to multiplexer inputs (or to master board pins) directly, without using any pull-up resistors, pull-down resistors or diodes.
The encoder terminals "A" and "B" always should occupy two adjacent inputs, and the common "C" terminal of each encoder connected to the common GND bus.
If the encoder has a built-in push-button switch you can connect and use it as any other "standalone" button for any simulator command, even not linked with encoder itself, or as push function for this encoder mode switching, to control more than one parameter with a single encoder.
Assigning the encoders in the plugin configuration window.
Select the encoder icon in the middle section of the configuration window, then click the first nput (N) for the encoder - either direct pin or multiplexer input (multiplexer should be assigned and opened before). You will see the assigned input in the configuration table and the next input (N+1) with the ">" sign. Enter the name for the assigned encoder (description of its function).
An encoder type and its acceleration (to MAX, or NO for single-step) can be configured in the plugin configuration window.
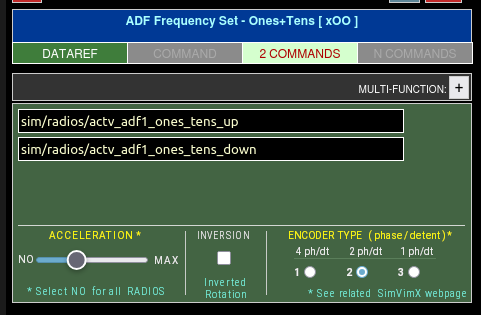
When assigning dataref or commands to the selected encoder in the plugin configuration window, you can also select additional parameters for its correct operation.
Selectable options: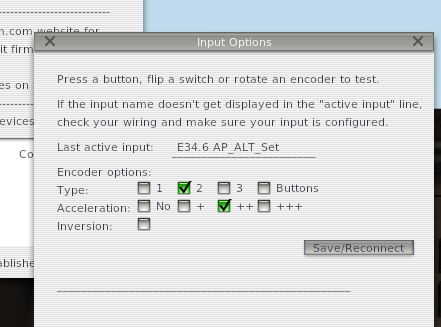
For SimVimX versions prior to v.3.0, only the online configurator is used and named parameters (keywords) are assigned!
After assigning encoder in the online configurator for the SimVimX versions before 3.0, you need to open the plugin menu to set the correct options for connected encoder. When connection with the board is established, open the "Input Options" menu in the plugin and rotate the connected (and configured) encoder.
Options for this encoder will appear. Select the correct encoder type (if you know it) and click "Save/Reconnect". The selected type and acceleration will now be saved.