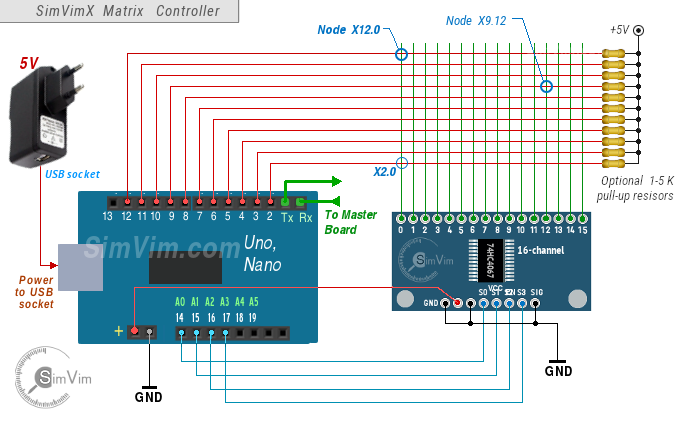
The additional (slave) "SimVim Matrix" controller board is Nano or Uno Arduino with special SimVimX Key-Matrix control firmware that you need to upload directly from the SimVimX plugin menu.
This board is connected with the Master controller board. The "SimVimX Matrix" firmware code of the slave board reads matrix grid state and sends it to the master board.
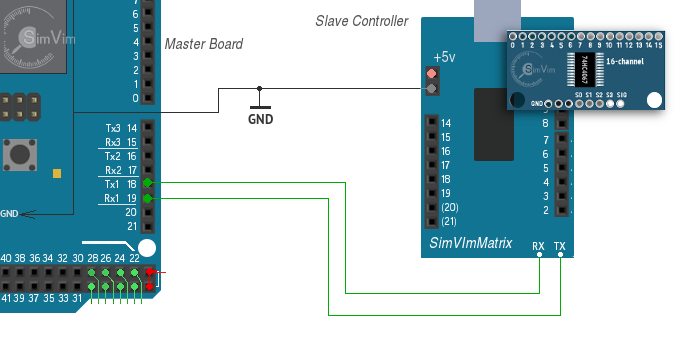
The "slave" controller board (Uno, Nano) is linked with the Master controller board using serial interface, when Tx output signal of one board is connected to the Rx iNput of another board. Connect the Tx pin (#1) of the slave board with Rx1 pin (#19) of the master board, and "slave" Rx (pin 0) - with the "master" Tx1 (pin #18).
1) The same Tx1/Rx1 are used for Stepper board. If you need to connectc both Stepper and matrix boards you need to connect them "in-chain" (Master Tx - to the slave #1 Rx, slave #1 Tx - the slave #2 Rx, the slave #2 Tx - to the master Rx)
2) Never forget to connect the GNDs of each board ( and other devices as well) to the common GND wire.
3) When you need to upload Matrix board firmware to the slave board you need to disconnect the Rx,Tx wires before uploading.
4) In case you have an irrelevant action of key nodes as (and the wiring is correct) you can add 11 pull-up resistors (1-5k) to each input line #2-12 (closer to the key matrix, not to the Arduono board!). .
Don't keep it connected to USB port after the Matrix firmware upload. Use any +5V source connected to the slave board using USB connector, or +5V pin.
In the Plugin Configuration Window: open the slave key-matrix board, select any momentary button parameter that you want to assign and select the matrix node you need